Pages

Wednesday 17 September 2014

can’t login to magento admin panel


Here I will show how to resolve the Magento admin panel login issue.
It’s a common issue: you are trying to login to the Magento admin panel, typed your username and password, clicked Login button and nothing happens. The page refreshes and that’s all. No error or any other messages.

can’t login to magento admin panel

 This is caused by the cookies issue. In some cases Magento can’t store them. Let’s see how the issue can be resolved.

Configure the IP Address from admin panel
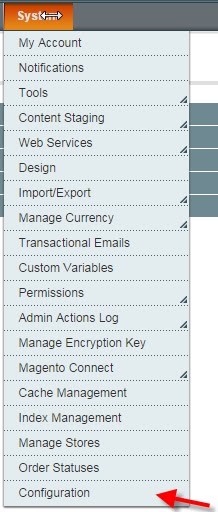
Login your magento admin panel System->Configuration->General->Web Section Configure the IP Address to Base URL from Unsecure tab & Secure tab, see below pic.

System Configuration


If this doesn’t help please proceed to other solutions
Edit Varien.php file
Open Magento installation directory and go to the ‘app\code\core\Mage\Core\Model\Session\Abstract’ folder. There open ‘Varien.php’ file with your editor (Adobe Dreamweaver, Notepad ++ etc).
Depending on your version of Magento the code can be different so I’ll show you several cases.
In the Varien.php file around 88 lines locate the code:
// session cookie params
        $cookieParams = array(
  'lifetime' => $cookie->getLifetime(),
            'path'     => $cookie->getPath(),
            'domain'   => $cookie->getConfigDomain(),
            'secure'   => $cookie->isSecure(),
            'httponly' => $cookie->getHttponly()
        );

and replace with
        /*
        // session cookie params
        $cookieParams = array(
            'lifetime' => $cookie->getLifetime(),
            'path'     => $cookie->getPath(),
            'domain'   => $cookie->getConfigDomain(),
            'secure'   => $cookie->isSecure(),
            'httponly' => $cookie->getHttponly()
        );*/

 And around 96th lines locate this code:
if (!$cookieParams['httponly']) {
            unset($cookieParams['httponly']);
            if (!$cookieParams['secure']) {
                unset($cookieParams['secure']);
                if (!$cookieParams['domain']) {
                    unset($cookieParams['domain']);
                }
            }
        }
and replace with
/*
if (!$cookieParams['httponly']) {
            unset($cookieParams['httponly']);
            if (!$cookieParams['secure']) {
                unset($cookieParams['secure']);
                if (!$cookieParams['domain']) {
                    unset($cookieParams['domain']);
                }
            }
        }
*/

if you have any queries feel free to leave a comment..
Tuesday 16 September 2014

how to create/set up and manage multiple stores

Here i will explain how to create/set up and manage multiple stores. Multiple Stores functionality allows you to power any number of stores or websites within a single Magento installation. It can be useful if you are going to sell products on different domains sharing the same admin panel and to track your sales and customers without having to login to the admin area of each website. Before going to create multiple stores we should create Categories, If you don't know how to Crate Categories go to this link and create.

1. Go to System -> Manage Stores

Manage Multi Sore

 2. Click the Create Website button

Manage Multi Sores


 where you need to enter:
    • Name – domain name of the new website
    • Code – a parameter that will be used in configuring the Apache web server to point to that particular domain name (without spaces)
  1. Click Save Website

Create Website


  1. Go to System -> Manage Stores and click the Create Store button.
  2. In the Website drop-down select the website the Name which you created before (2).
  3. Enter a Name – the same as the second website name
  4. Select a Root Category in the drop-down– the root category that will be used for this store. (Refer to Step 1 for details)
  5. Click Save Store.

Create Store Name


  1. Go to System -> Manage Stores and click the Create Store View button.
  2. In the Store drop-down select the store to which this view will be associated with.
  3. In the Name field enter a name of this store view (i.e. English Version).
  4. In the Code field enter a unique code for this store view.
  5. Select the Status – if enabled, this store view will be accessible from our frontend, otherwise, it will not be accessible
  6. Click Save Store View.

Create Store View Name


 Store Configuration in the Server


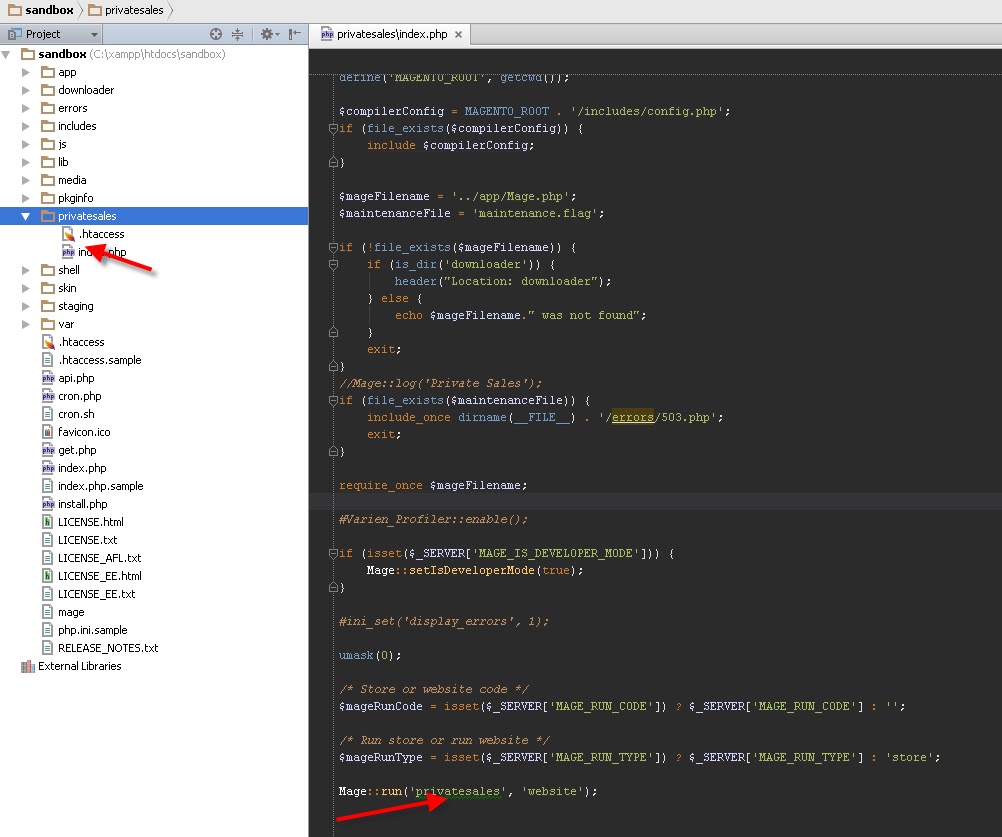
  1. In this tutorial we are going to see a second website at www.your_domain.com/magento/privatesales/. We are going to access the magento directory on our server and create a sub-directory folder privatesales.
  2. Copy the index.php file as well as the htaccess file from the magento folder over to the privatesales folder. In case you are using a different domain – copy these files to the root folder or your other domain).
  3. Open your index.php file and look for the following line 
    "$mageFilename = ‘app/Mage.php’;"
  4. Change it to 
    $mageFilename = ‘../app/Mage.php’;
  5. Save the changes
  6. Open up the copied htaccess file.
  7. Add the following to the end of it
    SetEnvIf Host .*base.* MAGE_RUN_CODE="base";
    SetEnvIf Host .*magento_site_2.* MAGE_RUN_TYPE="privatesales";
    where privatesalesis the website code taken from Step2 point 2 of this tutorial.
  8. Save the changes.

Private Sales

 9.In your Magento admin go to System -> Configuration -> General.


System Configuration

 10. First, make sure that the Default Config is selected in the configuration scope and click Web


 11. Change the Default Config to the to newly created website’s view in the configuration scope and click Web
 12. Under the Web click both the Unsecure and Secure tabs. You need to modify the Unsecure Base URL and Secure Base URLs with the corresponding domain name by unchecking the ”Use default [STORE VIEW]” checkbox and then save the configuration. In our case we are changing them this way (installed locally):


 13. Click Save Config
 14. Magento Automatically create welcome page under CMS->Manage Contents.


Private sales welcome page


 15. Click the preview button it will redirect to the Private Sales Store Welcome page.
Private sales welcome page 2

If you have any queries feel free to post a comment....


how to Create/Manage Categories in magento

Here i will explain how to Create/Manage Categories in magento. To manage your categories, you need to log in to your admin panel. And Click on Manage Categories under Categories.

how to Create/Manage Categories in magento


Adding Categories


One of Magento's great features is its hierarchical category navigation. This means that you can have many levels and sublevels of categories which will help you arrange your store better and make your products easier to find. The first level of categories is called root and they are used for store roots only, they won't display in the top navigation of your store.
If you have not installed Magento's sample data, you will have only one Root category called Default Category. Let's start off by creating a subcategory for it.

Adding Sub-Categories


To create a subcategory for a root category, you need to click on the root category to select it and then click Add Subcategory

how to Create/Manage Categories in magento 2


General Information


how to Create/Manage Categories in magento 3


Each setting marked with an asterisk (*) is required, the others are optional. Let's review each setting in more detail
  • Name - the name of the category as it will appear on the store's frontend; in our case, we'll call our category Laptops
  • Is Active - controls whether the category should appear on the frontend; since we want it to appear there, we'll set this to Yes
  • URL key - allows you to override the automatically-generated category URL; Magento automatically generates the SEF URL based on the category name; in our case, the name of our category is Laptops so the automatically-generated URL for it will be laptops.html; if you want to override that, simply type the URL you want to have; for example, entering cheap-laptops will result in a page name called cheap-laptops.html
  • Description - a description for the category that will be shown on the category page
  • Image - an image for the category that will be shown on the category page
  • Page Title - a title for your page that will be shown in the browser's title bar; in SEO terms, this is the title meta tag
  • Meta Keywords - your category keywords for search engine optimization; make sure you type only keywords relevant to your category
  • Meta Description - your category description for search engine optimization; it will appear in search engine results as the summary for the category
  • Include in Navigation Menu - controls whether the category should be shown in the top navigation of the store's frontend; we want it to appear there, so we'll set this to Yes; if set to No, the category will still be active but it will be accessible only through the direct URL, e.g. www.yourdomain.com/store/laptops.html

Categories

if you have any queries feel free to leave a comment.....